Friday, 5 April 2013

“Maintain default information of customer-Peachtree”


“Maintain default information of customer-Peachtree”
First go to the main menu of Peachtree software and click on the maintain menu in the top of menu bar and then select default information as you can see in the image below:


Now select the customers, from the side bar and click on it, the following window will appear when you click on the customers:


Now go to the first tab in the window which is of “payment terms”, there you will see the following terms written:
v C.O.D (Cash on delivery).
v If you receive the payment or cash exact on delivery time then choose this option.
v The next terms is “prepaid”, if you received the payment in advance then select this option.
v Next term is “due in number of days” when you click on this option, the following points will appear as shown in the figure below:
Following are mentioned the options for “due in number of days”,
:


v Net due in:  Here you select the due time for payment.
v Discount in:  Here you will write the no. of days, and if customer will make the payment within written days you will give the customers discount. You may also regret this option.
v Discount:  here the rate of discount will be mention.
v Credit limit:  Here you will mention credit limit, if amount of credit exceeds you will receive a warning message. It helps you memorize about your creditors.
The next standard term is “due on day of next month”, if you want to linger on the amount on any other day of next month then choose this term and mention the day on which you want to collect the amount, as you can see in the following window:


v The next standard term is “due at end of month”, if you want to collect the amount at the end of a specific month in which you making sales then choose this option.
The next tab is of “account aging” when you click on this option the following screen will appear:


Account aging means to make provision for bad debts.
v If you want to age accounts by invoice date, then choose the option “invoice date”.
v If you want to age accounts by due date, then choose the option “due date”.

The next tab is “custom fields”, when you click on this tab the following screen will appear:


In the custom fields there is some information which you can make enable or disable by clicking on the check box.
The next option is “finance charges” when you click on this tab the following window will appear:


There are following options in this tab:
v Charge finance charges: if you want to charge finance charges then click on check box and make it enable”.
v On invoices: here you will provide the grace days.
v Day’s overdue, up to: here you will mention the amount on which you are charging interest.
v Annual interest rate: The annual interest rate will be mentioned.
v On balances above that: the balances if exceed over then you will provide the rate of interest in this empty field.
v Minimum finance charge: here you will mention the minimal interest rate.
v Charge interest on finance charge: if the customer does’ not pay interest charges and you are willing to re-charge interest on the total sum, and then click on following option.

Thursday, 4 April 2013

Maintain Charts of Accounts-Peachtree


“Maintain Charts of Accounts- Peachtree

Charts of accounts:
   charts of accounts have listed the entire general ledger on; each account is accomplished by code I.D.

Maintain Menu: 
  First we open the Peach tree software and open our existing file from the Z drive and then open our company, from there we click on the maintain button on the top of the screen, as shown in figure below: 


when we click on the Charts of accounts the following window will appear on our screen: 


Here you type "account I.D","account description" about our account and the most important is "account type" without which you cannot save your workings.
 after providing the information you will enter the beginning balances, by clicking on the beginning balances , following screen will appear:


here you select the appropriate time period of entering your data ,and select the beginning balance as per according to the company’s beginning balances by selecting the appropriate balance date press OK button and Peachtree will appear the following screen:


here you enter all the accounts beginning amounts and keep on checking your amounts and accounts I.D ,because sometimes in hurry you do it wrong.
After this you close this window and again the maintain charts of accounts window will appear and you can also make it inactive as shown in following figure: 


by doing it inactive you cannot enter further transactions.

Friday, 29 March 2013

Maintain customer/prospectus- Peachtree

    "Maintain Customer/Prospectus-Peachtree"
After we open the company on peach tree we click on the Maintain option given in above task bar, this will show us a small window ,click on the "Customers/Prospectus"


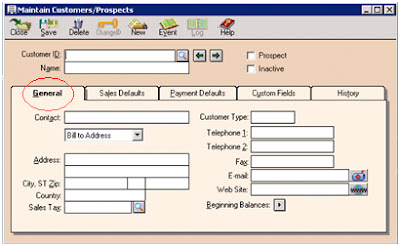
After we click on the Customer/prospectus , the following window will appear on our screen:


1. we will write the "Customer I.D"
2.then secondly , we will mention the "customer's Name"
3. and then in general tab (as highlighted in red) we will provide the other information regarding our customer.
then after providing the customer info. click the next tab as shown below:


Here we will provide the Sales representatives name and the General Sales Account, which is most important to be mentioned. here you mention your sales accounts i.d if u memorize it , and if not click on the search button very next to the GL. Sales Acct.and select it from there. After Sales Defaults next tab is of Payment Defaults, the screen in shown below:

Here you provide the payments details of your customers, but this step is not valid in PAKISTAN. The next step is of Custom Fields, it is shown and discussed below:

In this Section of Custom Fields you provide the other information about your customers, if you want to add some other points about your customer there is a field given for that also, as highlighted on point 5.The next tab is of customers history as shown in window below:


Here you can see the history about your old customers you can see last invoice date,amount, payments date etc.Next we again move back to General Tab 


Here we click on the beginning balance written on right below side of the window and following screen will appear:


Here you will write the beginning balances of your customers, but carefull about the company selected, like in above screen the invoice is of customer 100 of company ABC. if u want to select your other customer click on the Customer Balances Tab and select the customer from there as it is circled in above figure.


Thursday, 21 March 2013


Maintain Charts of Accounts
First we open a company on Peachtree . After that we click on “maintain” on the Peachtree task bar after that a drop box will be appear here we click on the “Chart of Accounts”


After we click on “chart of accounts” the following box will be appeared named “maintain chart of accounts”


Here we give the Account ID, Description and the most important thing the Account type.
For example
  • We enter account ID “141”
  • In Description we Write “LAND”
  • In Account Type select “Fixed asset”


And press save button to save changes. That i how we maintain the chart of accounts.


We can also “Delete” and “Change” an Account ID


Thursday, 14 March 2013


Setup a new company on Peachtree:
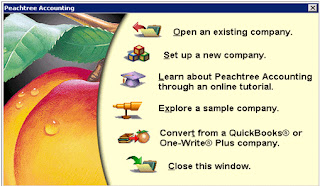
First we start the Peachtree software .After the start of the program the following screen will appear. To estimate  a new company click ‘set up a new company’ option and follow the next instruction.


In next step following introductory screen will appear to guide you the rest of the process. Read all the Introductory we click ‘ next’ as you see in this picture .

In this step you have to type the company information such as name , address , telephone no business type etc . but if you do not want to write all the option you just add the company name and click the ‘next’ batten. As you see in this picture.

In this step you can chose among several methods to setup the charts of accounts. Here you can chose charts of accounts already developed by software of many sample companies, or you can copy charts of accounts from existing peachtree company or another accounting software compatible with peachtree or you can build your own charts of accounts. We select the radio batten in build your own company and click the ‘next’ batten as you can see in this picture.

   In this step we have to chose “Accounting Method” . Three are two method cash and accrual. Accrual method is usually followed , where we accrue expanse and income weather paid or received or not . So we chose accrual method and click “next” batten as you can see in this picture.

In this step you can see the “Posting Method” by selecting the Real time posting method the transaction are posted to the General Ledger as they are entered and saved. While in batch, transaction are saved by program and then posted in group. This allows you to print and reconcile the transaction and then save . so we chose “real time method” and click “next” batten as you can see in this picture .

Then in the next step or phase you have to select the accounting period. Normal accounting period is 12 month accounting period. So we chose 12 month accounting period and click the “next” batten as you can see in this picture.

In the next step, you have to chose the month when the accounting period will start and the month when first time the transaction will recorded. Then we click “next” batten. As you can see in this picture.


By clicking next “congratulation” screen appear and by clicking “Finish” the company setup completes. As you can see this picture.

Thursday, 7 March 2013

How to open a file in Word.


How to open a file in word:

press the control key and the key “o” at the same time , a short window will appear on your screen , browse there the name of Microsoft Word and left click on the open button given on the right below of the same window the Microsoft word will be open in front of you.


Opening Microsoft Word Documents

We'll shortly add an address to the top of our Library Complaint letter. Before we do that, we'll learn how to open a file. After all, you might have closed down Microsoft Word, or your computer might have crashed. The result being that you no longer have your library letter loaded into Word. So here's how to Open a file you have saved, and want to work on again.
From the File menu, click Open:

The Open dialogue box appears, and looks like the image below:

The Open dialogue box looks very similar to the Save As dialogue box. "Save in", "File name", and "Files of type" work in exactly the same way as the Save As dialogue box. Notice, though that the File name text box is blank, and the Open button is not available. It has been greyed out.
The reason that the Open button is greyed out, and therefore not available, is that text box is empty. Once you select a file, the Open button will be ready for us.
But the text box is empty because no file has been selected. A file is selected from the larger white area in the middle. Clicking on the file once with the left hand mouse button will select a file. In the previous image, there was only one file available for selection - a document called "rrKeyCaps.doc". That is not the one we want.
To locate the file we want, we need to open the folder called "My WP Projects". Because that's where we saved it. You can see from the image that this folder is in the list of folders, just below the folder called My Pictures:
A list of available folders
You can see also that we are in the folder called My Documents. To open up the folder we want, simply double click it. This will take us inside the My WP Projects:
Double clicking a folder takes you inside of that folder
The whole Open dialogue box now looks like this:
The new Open File Dialogue
The file we want, Library Letter, has been clicked on. As a result, the Open button is no longer greyed out. We can go ahead and click it. When we do, our letter will open in Microsoft Word.
To recap then on how to open a file. Do the following
· Navigate to the folder where the file was saved
· Click on the file to select it
· Click the Open button
OK, now that you know how to Open a file, we can start adding the address to our letter.